Command & Conquer

- Developer: Virgin
- Genre: Strategy/Wargame
- Originally on: Saturn (1996)
- Works on: PC, Windows
- User Rating: 10.0/10 - 2 votes
- Rate this game:
Game Overview
What would you do with a PC game that sold over 1 million units worldwide? Besides the obvious answer (release a sequel), you'd probably want to bring it out on other platforms. And that's exactly what Westwood Studios did. Saturn (and PlayStation) owners are owing to be treated to one of the most popular PC strategy games of 1996. Now, console owners will be treated to some of the PC's best.
Command & Conquer is a present-day strategy war game whose engine is based on the classic game Dune II. Since most console owners are accustomed to action-oriented games, a real-time strategy game lends itself well to the market. Everything in C&C is moving and acting, without regards to what you are doing. Forget about taking your time during your "turn." This is action-strategy at its finest.
The setting for C&C takes place in a world where the key to power is control of crystals called Tiberium. A terrorist group called the Brotherhood of Nod controls about half of the world's supply of Tiberium and is quickly taking over the reigns of control of the world. To combat Nod. the United Nations formed a special operations group called the Global Defense Initiative (GDI).
In C&C, you can choose to play either as the "good guys"-the GDI or as the "bad guys"-the Brotherhood of Nod. Each group has its own completely separate set of missions, as each has its own goals in the world. The game will ship with two discs-one for each side.
After choosing the team you wish to play as, you will be briefed as to what your individual missions will be. These missions will all be different from one another. For example, the first GDI mission has you establishing a foothold on the enemy's beachfront. Kill all of the opposition, and you shall move on. Next, you are sent to help GDI forces who were ambushed in a Nod attack. When playing the Brotherhood, you may find yourself executing key political figures or running rescue missions to save your captured brothers-in-arms.
The parameters of every level is what truly sets each mission apart. In some stages, you will start with only a few soldiers. It is your responsibility to establish and defend a base from which you will build our army. In other missions, you will only have a set amount of troops, with no chance of creating more (although reinforcements may be sent your way). You will have to complete your objective(s) with only the units and supplies given to you.
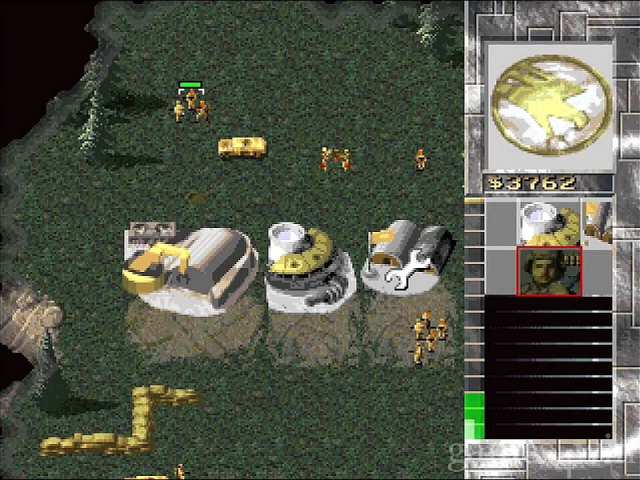
In those missions where you are allowed to build a base, you'll usually start with a Mobile Construction Yard. This vehicle transforms into your starting base, from which other structures and units can be formed. Eventually, you'll be able to create barracks, guard towers, weapons factories, power plants. SAM sites and more. These buildings can help you defend your base, produce offensive soldiers and craft (see sidebars), provide power, etc. You'll be allowed to build a Tiberium refinery, which will let you collect and process Tiberium crystals (which in turn brings you your only source of income).
The game becomes fast and furious as you are forced to make quick decisions during the heat of battle. Will you pour out offensive unit after unit for a quick and decisive victory? Will you spend valuable resources to defend your base? Will you rush out to gather the remaining supply of Tiberium, before your foe does? Will you take your time and build a powerful base? Don't ponder too long, for the enemy will always be preparing for your defeat, whether you're ready or not
Command & Conquer is making its next strategic move to the Sega Saturn. Based on the original version for the PC, C&C for the Saturn will be taking advantage of the Saturn's graphic capabilities. The player can choose from two forces. The first team is called the Global Defense Initiative. They are the good guys of the game. The second team, called the Brotherhood of Nod are the bad ones. The gameplay is like Dune II and Warcraft using strategy and plenty of armor, weapon and base upgrades to choose from. There are dozens of missions to complete so gamers should have a field day with this one. The object is to collect as much Tiberius as possible. Command & Conquer features over 90 minutes of video that contain live actors and 3-D-rendered cinemas. Unlike some other games that have odd video sequences, C&C uses actors that seem real.
People say:
9.0I remember this one (rom the PC a while back. I'm glad to say that I like this one Just as much it not more. The soldier graphics are small but extremely detailed, and the buildings are tine. The music gets a little repetitious, but the sound effects are perfect (those enemy screams get better with each kill). Plus, there are many different options within the game like all the different types of buildings and soldiers you can construct. I also like the option of sending engineers Inside the enemy compounds and taking them over. And this is only the tip of the iceberg-this has the qualities of a classic. Tight from start to finish.
9.0On the PC side, C&C would've been a big hit with me had It not been (or the superior Warcrafl II. But looking at C&C by Itself, it is an excellent example of how to create a fun, non-threatening real-time strategy game. The Saturn port is dead-on. I could find very little wrong in the translation. As (or the game itself, I wished that the units could've been made a bit larger (Westwood should've made a special enhanced Saturn version). That aside, C8C offers gamers the technique of an excellent strategy game, combined with the excitement of an action hit. Tills Is no boring turn-based too-many-details strategy game
9.0No other strategy game on the Saturn Is easier to get into than C&C. You can learn its interface in under five minutes, and from that moment on, the game is every bit as fun and addictive as the Saturn's reigning strategy-game king, Dragon Force. Mission variety Is C8C's best feature. There are more than 30 missions altogether, and they vary from simple search-and-destroy outings to rescue and assassination attempts. You can even choose whether you want to be the good guys or the bad. The game's graphics, although adequate, are Its only downside. The soldiers are so tiny that It's hard to differentiate the troop types.
8.5Command & Conquer Is a wonderfully done strategy game Its simple interface really allowed me to get Involved with the action far more than I had expected. While not as complex as Dragon Force, it has enough variety to keep you coming back for more. I would have liked to have seen a few more features or modes of play for my little people, like calling for a napalm strikevoudear weapons or a Kamikaze Mode (Cowabungal), but after some improvising, I had tons of fun anyway. The nicest thing about a solid title like this is dreaming of the things that'll be in the sequel. Don't forget to send in the citizens...
The GDI Missions
There are 15 Missioins to be completed on the gdi tour, out of a grand total of 25 possible combinations. Although your missions may not be exactly the same as those selected here, you should find that they are the most common ones.
'Real Men Never Read The Manual'
It's important to read the 'Read Me' file on the CD before you start. Note the special keys, as a few of them really are essential; for example, vehicles such as apcs and tanks can destroy dangerous ground troops by driving over them, but the only way to force them to do this is by using the special keys.
Level 2
The purpose of this level is to teach you the importance of engineers. Select an engineer, then point at an enemy building to get the three arrowhead icon: this means that you warn engineer to enter and take coil the structure. Once your engineer is safely inside the building, any resources and capabilities become yours. The different weaponry which only the Noddies are capable of producing can now be created for your purposes, and turned against the bad guys. Even more importantly, you can sell the building for loadsa money, which you may badly need.
In the beginning keep the engineers in a safe place until the Humm-Vee reinforcement arrives, then strike North to take the enemy camp. Move your engineer into the refinery to gain his cash balance, then destroy everything.
Level 3
Locate the enemy SAM sites and destroy them all.
You will now be able to use the weapon of an air strike.
Level 4
Retrieve the crate of rods.
The trick to this level is to realise that you don't have to destroy the enemy to win, so don't bother to fight, just run around them. An apc loaded with troops can make a rush for the top-left hand corner of the map, jump out next to the box and touch it to accomplish your mission. Other re-enforcements turn up periodically but you can win without their help.
Level 5 - Germany
Repair your base then destroy all Nod forces
Head for the bottom-right hand corner to regain your base. Once your harvester gets going you can rebuild your base and prepare to attack the enemy camp in the top-right of the map. Knock out the enemy harvester to cut off his supply of cash and stop production of enemy weapons, then simply wear the bastard down by constantly attacking him with lots of Humm-Vees.
Level 6 - Czechoslovakia
Infiltrate the enemy base and destroy any of the buildings
This particular level is brilliant fun as it introduces the commando. The aim is to use the commando to destroy any single building within the enemy camp. There's no need to demolish all of the sam sites, simply rush up the left hand side of the screen while you use the helicopter to lead the ground troops away from you. From the top left move into the centre to find an entrance. Handy hint: While you can't land your helicopter in a darkened part of the map, you can land just inside the edges of the unknown area. As it lands a large area of map will be uncovered. By leapfrogging your helicopter forward you'll quickly uncover big lumps of the enemy territory.
Level 7 - Czechoslovakia (again)
Destroy all Nod forces
Start off by creating your camp in the bottom-left corner. Quickly set up a refinery and get the cash flowing. Build four machine gun posts as soon as you possibly can in order to stave off the early attacks. Once established, attack up the left-hand side, then move across at the top to find the west side of the enemy camp.
This mission will teach you that heavy weapons are not necessarily the answer to all your problems. The enemy has seemingly endless ground troops, and you'll find that they are more than a match for tanks. Should you attack their stronghold with battalions of heavy metal you'll get creamed like a Gulliver dragged down by the miniscule Lilliputians, (which is extremely bloody painful!). A few tanks are required to silence the large gun on the north-west corner of the Nod camp, and then to blast a hole in the barrier wall.
Now by using lots of small squads made up of three or four mixtures of ground forces, you can hold the enemy inside this entrance while a troop carrier loaded with an engineer can nip inside and grab control of the refinery. With possession of the refinery you will gain all of the enemies' gold, allowing you to create even more troops for the final assault. Don't commit everything in a mad attack - it's better to draw them out into your prepared position.
A lumbering harvester makes a good battle wagon for steering into a crowd of waiting troops and cutting down their number in a dramatic way.
Level 8 - Austria
Repair your base and then wipe out all Nod Forces
This mission is a walkover. Begin by repairing your power stations and the refinery, then send out the harvester. Quickly move all forces out to control the bottom-left corner and the area immediately north of the camp to repel the first attack. As you can't build new vehicles, return them one at a time for full repair. From here on in return vehicles for repair as soon as you can after each skirmish, for once they are destroyed they are gone forever. Use troops to carry out dose attacks as they can be replaced and you can easily make more money harvesting. Follow the route over the bridge and then the route to the north. Eventually you will find yourself on a ridge above the eastern side of the enemy camp.
From here you can pound the troops and buildings below with little or no risk to yourself, as the Noddies stand around below you waiting to be shot like fish in a barrel. A final rush of troops and engineers in armoured carriers can make the journey up the west side of the map, past the two large turret guns, and seize the buildings which are left standing.
Level 9 - Hungary
Destroy two gun turrets to the south of the river
Don't let yourself be fooled by this mission - you can't cross the river. The small group of men that are landed on the south bank cannot be replaced or re-enforced, so to begin with you must leave them alone.
The trick here to succeed is to destroy all of the sam sites on the north side of the river, so that an air strike can be called up to weaken the southern guns - then your small platoon can finish the job in a final assault.
Level 10 - Slovenia
Using Orca helicopters, Scout and Destroy
Build at least three airfields, placing them together so they can be easily refuelled and controlled. One attack wave from these will take out a gun turret. This level introduces you to sandbags, the Noddy's Achilles heel. Your high-powered, super-techno foe appears to be completely dumbfounded by bags of sand, and when he meets a line of them blocking his path he will stand alongside them until you kindly turn up and blow him away. Use a fast scout car to run through the gorges and show you the position of the guns, then use the Orcas to take them out.
Level 11 - Greece
Find the spy Delphi and get him home
On hitting the beach, quickly move right and deploy your men to destroy the tank. Move up the map and then right to park your construction sight on the edge of the Tiberium field. Build 'lots' of gun turrets as fast as you can. because the bad guys are on their way.
It's worth keeping a 'ready built' turret to place in the middle of attacking troops once they turn up. Arm your camp to the teeth with turrets and Orcas as you'll be receiving many irate visitors.
The spy is standing in the top-right corner and once you have 'clicked' on hint a rescue chopper will turn up as soon as the sam sites are neutralised.
Level 12 - Albania
Get Doctor Mobius to safety
You can't replace any lost vehicles, so don't be in a hurry to leave camp - let the enemy come to you and destroy from prepared positions. Doctor Mobius is in your camp, so all you need do is destroy the sam sites to bring in the rescue helicopter. If you get short of cash remember that you can sell redundant buildings. There's also a treasure chest to be found in the village to the north east.
Level 13 - Yugoslavia
Destroy Noddy's lab
You now have the super Ion cannon which deals powerful blasts to distant locations. You can either play this level for hours slowly inching your way across the map destroying a heavily dug-in enemy force, or you can win in a matter of minutes by remembering the purpose of the exercise. If you send a fast scout car up the right hand side of the map to the top corner and then move towards the middle you will find a wall. Behind the wall - completely undefended - is the enemy lab. A couple of Orcas, aided by a blast from the Ion cannon, and it's Mission Accomplished.
Level 14 - Yugoslavia again
Fish in the barrel
Keeping your ground troops spaced out to avoid being crushed by stealth tanks which suddenly appear, this level is a simple 'walk in the park'. Stealth tanks are scary because they are invisible, but they are also made out of tissue paper and tend to stand in the same spot.
Send a scout car around to find them, take note of their location, then return with the heavy mob. You can surround the spot where the stealth tank was seen, then attack.
Level 15 - The Big One!
This is the level where you can sandbag the bastard to death. On arrival, move across the bridge and turn right into a gorge beneath a gun turret (you should see an enclosed Tiberium field to your left). Fast as you can, set up a sandbag line across the mouth of the gorge, then extend it to the left and right. You'll need a few bazookas to protect yourself and take out the early visitors. The enemy's only access to the whole of the bottom half of the map is through a single entrance to your north-east. Sandbag a single line towards this entrance and seal him in.
Get two engineers ready to take over the enemy structures which will suddenly appear in the field to your left, and lay a single sandbag over the spot between them, where a deadly Obelisk will sprout. You are now free to build an advanced guard tower and take out the gun turrets. With the bottom half of the map and all of the Tiberium, you now can build a force of at least six Orcas ready to start knocking out the opposition. Once the Ion cannon is online, you can zap your way into the entrance of the sandbagged enemy camp and use engineers to take over the Hand of Nod and Airport.
"Warning, warning!" The Noddy forces now have access to atomic weapons and during play you will be hit at least once. This one blast can destroy your entire camp, so it's a wise move to invest in a mobile construction site which will enable you to set up a second camp from where you can rebuild if things get wiped out.
The Nod Missions
The basic strategy for most of the levels in Command & Conquer is to get an engineer into any outlying GDI building and then immediately place a sandbag next to it. It's worth doing this, because you'll find that even if the building is destroyed, your sandbag will be left untouched and you can build onwards from there. More sandbags can be constructed to surround enemy buildings or you can repeatedly build gun turrets in the heart of the enemy camp. Remember: gun turrets and advanced guard towers will destroy enemy structures, but only if you tell them to.
Have you got what It takes to go nuclear?
No doubt you suffered from the Nods' nuclear blast when you played the part of the GDI Commander, and now you're looking forward to getting your finger on the button yourself. Ah, if only life was that easy. Building a temple in the final mission doesn't give you nuclear capability unless you previously found the three required components hidden within crates on Levels 6, 8 and 12. You will obviously find the correct crate on Level 6 as that is the purpose of the mission. On Level 8 the crate is sitting in a fenced area next to the two GDI helipads. On Level 12 you must search for the crate beneath the GDI construction base.
The Nod Missions
There are 13 levels in any one game, but you could choose a different set of missions to the ones selected here. Hopefully this list includes the most popular battlegrounds, and addresses the most common trouble spots.
Level 1
This is just too easy to explain. If you can't win this one, pack up your kit and go home.
Level 2 - Egypt
Sneak in troops and destroy everything
You have enough cash to create a massive army. Create engineers to seize the GDI refinery and construction at an early point and you're unbeatable.
Level 3 - Sudan
Release the prisoners
Don't waste time exploring - your one task is to get an engineer into the prison building on the top-left corner of the map. Take a bazooka soldier with you to open the camp's north-east boundary wall, then strike across for the prison. This manoeuvre will take you 15 minutes tops!
Level 4 - Chad
Eliminate GDI
Quickly reach the friendly villagers at the bottom-right of the map and stop the killing. Once the village is secured destroy all GDI forces and unfriendly villagers. Move across the map using assault bikes to run forward and lure GDI troops into a prepared arc of your troops.
Level 5 - Mauritania
Set up SAM sites and destroy GDI base
Move up the left-hand side of the map and enter the camp at the back wall, completely ignoring the front entrance. With a couple of engineers you can seize the refinery and construction site.
Level 6 - Ivory Coast
Steal crate containing nuclear device
Take the right-hand group to the back wall of the GDI base as your left-hand group makes for the front entrance. While the front door team attacks, use the other group's assault cycle to break a hole in the top-left wall. Retreat your assault cycle and hide it in the top-right of the map. The enemy troops will pour out of the top of the camp and head left. Once the way is clear, run the assault cycle in through the back door and grab the crate in the bottom-right. Leave using the nearby exit and find the flare in the bottom-right corner.
Level 7 - Central African Republic
Steal an orca
You must get at least one engineer through to take over a helipad and use it to pound the village in the top-right corner of the map. You can ignore your group which is designed to threaten the side gate; concentrate on the group containing the engineers. There are three gullies down which your troops can go. Send the tank and bazookas down the dead end gully on the left to destroy the tank and then threaten the camp. Meanwhile hide your remaining troops in the top of the right-hand gully. The GDI troops will charge up the centre one and then down the left. Once they've gone past, your hidden troops can burst out and rush down the centre gully. Sacrifice everyone to get one engineer to the helipad.
Level 8 - Zaire
Locate abandoned GDI camp, restore It and use the weapons to wipe out all opposition
Sell the construction site and use the money to buy some engineers. Place the engineers on the Chinook and capture the enemy refinery - wait until there is a harvester unloading inside. Create lots of bazooka troops to take out enemy orcas. An apc loaded with engineers and bazooka troops can be rushed past the GDI main gate and around to the wall at the bottom-right corner of the camp where they can break in. Destroy the power station to silence the advanced guard tower, and you're home and dry.
Level 9 - Egypt
Reinforce your base and destroy all GDI forces
Build a sandbag perimeter and reinforce it with sam sites. The trick here is to use assault bikes which can speed past the GDI camp entrance and get around to the back wall, where they can then break in and destroy the power stations and refinery.
Level 10 - Angola
Locate the laboratory and kill the doctor using a sniper
Go north from the start point. You have few troops, so conserve them. Use a fast vehicle to run forward and then lure GDI forces back into a prepared ambush. Use the commando to pick off grenadiers from a distance. In the final moments a Nod Chinook will appear; load up the commando and then use it to hop over the final defence troops to land behind the doctor.
Level 1I - Namibia
Recover stealth tank technology
You are given two detachments, each on a different side of a river. The single purpose of the southern detachment is to make its way to the bottom left-hand corner and destroy the church to find the crate of money. The long range guns can also be useful for guarding your camp's front gate later on. The northern detachment must instantly fight its way out of the top-left corner and head for the southern entrance of the abandoned camp midway down the left-hand side of the map. Sacrifice everything to get your engineers plus commando inside to take over the buildings - but leave the high tech lab alone, as it requires you to sneak past all enemy vehicles and avoid being shot from the river, so time your move to miss the boat. Your initial tasks are to build sam sites to protect the camp from airstrikes, defend the camp entrance from attacking GDI forces, and destroy the ship which strikes from the river.
The ship can be dealt with by positioning two gun turrets on the river bank - use sandbags to get out there.
The gun turrets backed up later with an obelisk tower (position it well back from the river or the ship will attack it) will guard the gate.
Airstrikes will cause you grief, but if you haven't wasted an engineer taking over the high tech lab in the early phases of the game they won't attack it. Your final act of the game will be to take over this building.
Level 12 - Botswana
Capture the technology centre and recover the codes Attack the two mammoth tanks with an assault bike and lead them away from the bridge to get your main force over and set up camp along the left edge of the map. When the tanks return, again use a bike to lure them back over the bridge. If you sacrifice the bike out of sight of the bridge the tanks will remain where they are and will not return. Basically, if you leave the enemy alone while you build up your base, they'll tend to ignore you. The level is won when you use an engineer to secure the building in the top-right corner of the enemy camp.
Level 13 - South Africa
Build a temple and destroy all GDI forces
Begin here by using your engineer to commandeer the GDI Chinook; this can then be used to rescue the commando from the nearby island. Destroy the island church for a chest of money. Set up a small island camp, but don't spend too much because you'll be transferring to the mainland as soon as a second construction site turns up. Use the Chinook to ferry a few men across to the mainland to wait. There are two main GDI sites: at the bottom-left and top-right of the map.
A trick is to block one end of the bridge which leads south from the northern camp by using an invisible stealth tank. As the northern troops won't be able to see the tank, they can't attack it - but the computer will not allow the troops to walk through an occupied space, so they are well and truly stuffed. With the northern army held in their camp you are now free to sandbag your way south from your own camp into the GDI base, right to the back wall, and deploy gun turrets to wipe out the surrounding opposition. You can also block the entrance to their own refinery and starve them of cash. Use the Chinook to fly in an engineer to grab a helipad. You now have the technology to build your own. Build up this southern base as your main camp while leaving the GDI airstrikes to waste their time on your original ones. Go east and take over the GDI weapons factory, which will provide you with all of the enemy's technology.
Finally, attack the east side of the north camp and sacrifice everything to get an engineer inside any structure -you are now free to sandbag and gun turret your way to victory. Make sure you have a sandbag ready to drop next to your first captured building and they'll never get you out. No nuclear weapon is required to win: simply destroy all structures and most of the village huts to achieve victory.
And finally...
Did you know that one of the three main management functions within Windows 95 is the Graphical Device Interface - referred to throughout all the technical manuals as the GDI? There are myths surrounding all the best games - even C6C has its own X-Files entry. Have you seen the spaceship which is supposed to mysteriously appear above the battlefield when you least expect it? Is it true, are 'they' out there, or is it a figment of a late-night imagination? While we haven't actually seen it ourselves, we are told by those who know that it only appears during multi-player mode. If you've seen it, write and let us know.
System Requirements
Processor: PC compatible, P-200
OS: Windows 9x, Windows 2000 Windows XP, Vista, Win 7, Win 8, Win 10.
Game Features:Single game mode
Command & Conquer Screenshots
Saturn Screenshots
Similar Games
 Age of Empires 2: The Age of Kings
 Civilization: Call to Power
 Emperor: Battle for Dune
 Empire Earth
 Jeff Wayne's The War of the Worlds
 Kohan: Immortal Sovereigns
 Praetorians
 Shogun: Total War
 Star Control 3
 Star Trek: New Worlds
 Star Wars: Galactic Battlegrounds
 Star Wars: Rebellion
 StarCraft
 Syndicate Wars
 The Nations
 Total Annihilation: Kingdoms
 Warhammer: Dark Omen
 Warzone 2100
 Dragon Force
 Dragon Force 2
 Norse by Norsewest
 The Horde
 The Tower
 Warcraft 2
 The Humans
 Pacific Theater Of Operations